A proxy server Chrome helps you browse securely, access restricted sites, and control traffic efficiently. 9Proxy understands that navigating online privacy and access can be overwhelming; that’s why we created this ultimate guide. Whether you’re a beginner, developer, or marketer, this step-by-step tutorial will help you understand exactly what a Proxy Server Chrome setup involves and how to configure it easily.
Since Chrome doesn’t have a built-in proxy manager, learning how to set up or change proxy settings properly can greatly improve your browsing experience. With this article, you'll learn how to protect your security better, smoothly access global content, and gain full control over your online identity across any operating system or browser extension.

Understanding Proxy Server in Chrome
A proxy server Chrome acts as a bridge between your computer and the internet. Instead of connecting directly to websites, your requests first pass through the proxy, which hides your real IP address and enhances privacy or access control.
Google Chrome doesn’t have its own built-in proxy manager; instead, it relies entirely on your system’s network configuration. This means any proxy settings you apply on Windows, macOS, or Linux automatically affect Chrome and other apps using the same system settings.

Why Use a Proxy Server For Chrome?
Why should you take the time to configure your proxy server Chrome settings? The benefits are clear: better privacy, access control, faster browsing, and improved online security.
Improved Privacy and Security: A proxy acts like a protective wall between you and the web. It hides your real IP address, making it harder for websites or malicious trackers to trace your location or monitor your activity. This setup is also helpful for AI-based tools, where a ChatGPT proxy is often used to manage IP rotation, stabilize access, or handle usage limits while keeping browser identity separated from the original network.
Access to Disabed Content: If certain websites are restricted due to location or firewalls, a proxy server can route your connection through another region. Assigning you a new IP address helps you reach the content you need without limitations. This method is widely used when users want to change IP with a proxy for research, testing, or accessing region-limited platforms without modifying their entire network setup.
Bandwidth Savings and Faster Speeds: Caching proxies store copies of frequently visited pages. When you revisit those sites, the proxy loads them directly from its cache, saving time and reducing data usage. Many systems use a squid cache proxy server setup for precisely this reason to accelerate browsing while saving bandwidth.
Control Over Internet Usage: Businesses and individuals use proxies to filter content, disable certain sites, and monitor network traffic. This provides both enhanced security and efficient bandwidth management.
How to Set a Proxy Server in Chrome?
Because Chrome relies on your computer’s system network settings, setting up a proxy server on Chrome means making adjustments to Windows or macOS. You can also use browser extensions for quicker, more flexible control. Below are the most common methods to change Chrome proxy server configuration.
Setting Up Proxy on Windows
Setting up a proxy on Windows is simple since Chrome directly links to your system’s network menu. Follow these steps to complete your configuration:
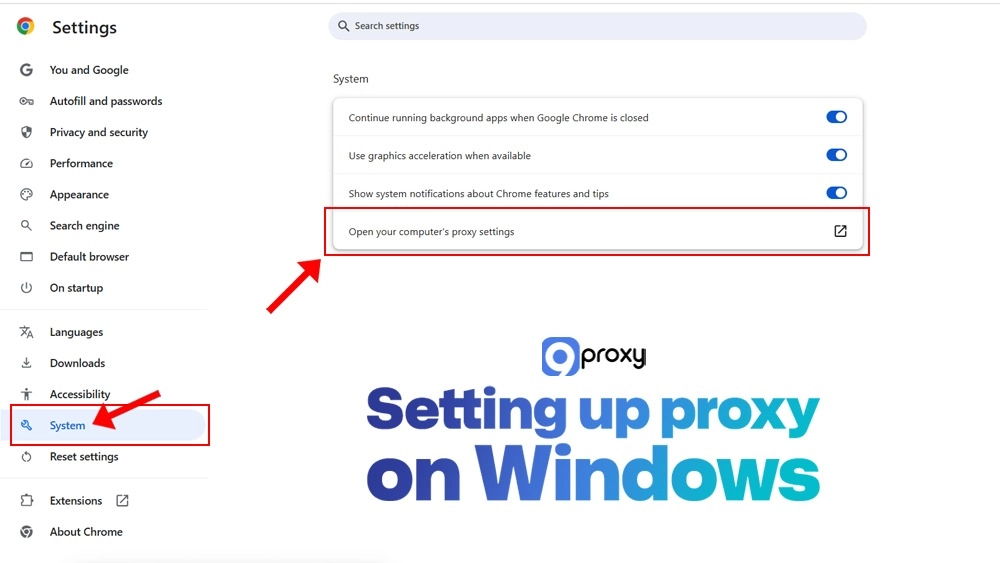
- Open Chrome Settings: Click the three dots at the top-right corner and select Settings.
- Go to System: In the left sidebar, click System.
- Access Proxy Settings: Click Open your computer’s proxy settings.
- Manual Setup: In the Windows settings, click Set up under “Manual proxy setup.”
- Enable and Enter Details: Turn on Use a proxy server, then input your IP address and Port number (provided by your proxy service, like 9Proxy).
- Add Exceptions (Optional): Enter any websites you don’t want to use the proxy for, separated by semicolons.
- Save Changes: Click Save to apply.
Once saved, Chrome automatically routes your traffic through the configured proxy server. Chrome setup for safer, more private browsing.
Setting Up Proxy on MacOS
The setup process on macOS is nearly identical, using your system’s network preferences. Here’s how:
- Open Chrome Settings: Click the three dots, then choose Settings.
- Go to System: Select System from the left menu.
- Access Proxy Settings: Click Open your computer’s proxy settings to open macOS Network Preferences.
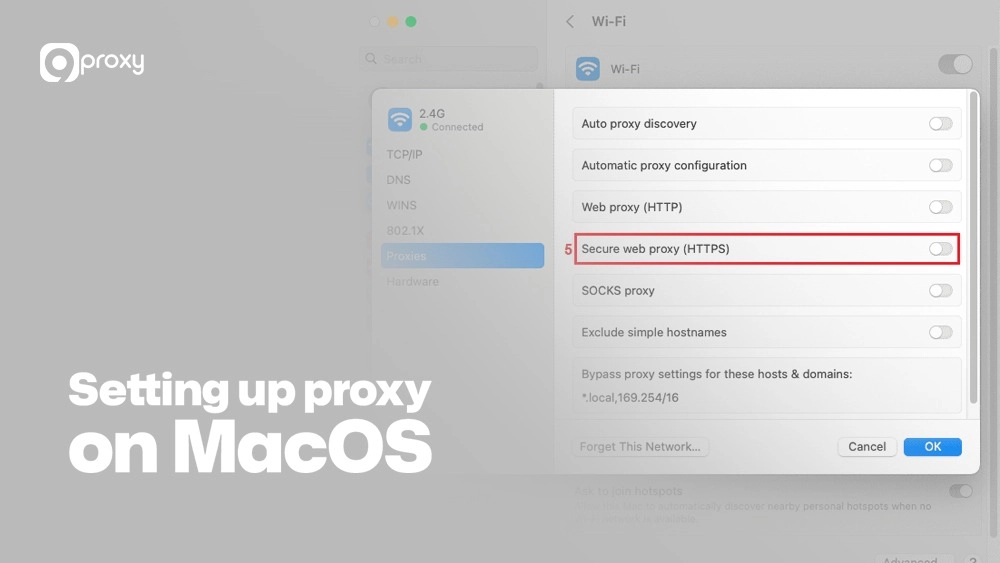
- Select Network Interface: Choose your active network (Wi-Fi or Ethernet) and click Details.
- Open Proxies Tab: In the pop-up, click the Proxies tab.
- Enter Proxy Details: Check the proxy type you’re using (HTTP, HTTPS, or SOCKS). Enter the IP address and Port number for your proxy. If needed, enable authentication with your username and password.
- Apply Settings: Click OK, then Apply to confirm.
Your Chrome browser will now use your Mac’s configured proxy server for all browsing activities, providing enhanced control, privacy, and accessibility.
Setting Up Proxy Extensions (Optional)
Using browser extensions is the easiest and fastest way to manage multiple proxies or switch between a proxy and no proxy. These tools provide a simple, visual interface, so you don’t have to open system settings each time you want to change the proxy server in Chrome.
Extensions are useful for users who need to change proxies often, such as for SEO research, development testing, or handling multiple online accounts. They also support workflows where browser traffic must align with command-line tools or automation scripts. For example, developers who configure a wget proxy often pair it with Chrome proxy profiles to keep browser testing and scripted downloads consistent under the same IP routing rules.
Below are some recommended Chrome proxy extensions and their main use cases:
| Extension | Primary Use Case | Key Feature |
| Proxy SwitchyOmega | Advanced users or developers | Easily manage multiple profiles and switch between them quickly. |
| FoxyProxy Standard | General users or marketers | Simple setup supporting various proxy types like SOCKS, HTTP, and HTTPS. |
| SetupVPN | Security and privacy-focused users | One-click proxy and VPN combination for secure browsing. |
These extensions simplify proxy control in Chrome, saving time while keeping your connections flexible and secure.
Change Proxy Settings Easily
If you want to quickly turn your proxy server on Chrome on or off, here’s an easy guide using the methods we’ve already covered. Following best practices is important to keep your IP hidden and keep away from DNS leaks that could affect your privacy.
Quick Change via System Settings (Windows):
Open the Windows search bar, type “proxy”, and select Change proxy settings. Then toggle Use a proxy server On or Off to instantly enable or disable it.
Quick Change via System Settings (macOS):
Go to System Settings → Network → Details for your active connection, then open Proxies. Check or uncheck your proxy type (for example, HTTP or HTTPS) to turn it on or off.
Quick Change via Extensions:
If you use tools like Proxy SwitchyOmega, you can switch between proxy profiles or return to a direct/system connection with just one click on the extension icon in Chrome.
Best Security Practices:
Always use trusted proxy providers and prefer HTTPS or SSL proxies, which encrypt your data between Chrome and the proxy server. Regularly test proxy performance and check for DNS or WebRTC leaks to keep your real IP hidden. If you work across multiple devices, aligning desktop proxy rules with mobile setups, such as configuring iPhone proxy settings, helps maintain consistent privacy behavior across your entire browsing environment.
By managing your configuration through extensions or system settings, you can change the proxy server in Chrome easily while maintaining top-level security and privacy.
Solving Proxy Issues in Chrome
It’s quite common to face small issues when setting up a proxy server on Chrome, but understanding how to identify and fix them will help you maintain a stable and secure connection. Here are some of the most frequent errors and their solutions.
ERR_PROXY_CONNECTION_FAILED
This usually happens when the IP address or port number is incorrect, the proxy server is offline, or your firewall is preventing the connection. To fix this, double-check that the IP and Port details are correct. If the issue persists, try turning off the proxy temporarily to confirm whether the problem is with your local network or the proxy itself.
Connection Timed Out
It can occur when the proxy server is too slow or overloaded. In this case, switching to a faster server or contacting your proxy provider for assistance can help restore normal browsing speed.
Authentication Required
It means that your proxy credentials were not entered properly. Make sure your username and password are filled in correctly in your system’s proxy settings or within the Chrome extension you’re using.
Check if your proxy is working
With this error, visit an IP address checker such as WhatIsMyIP.com. If the displayed IP matches the one provided by your proxy service, your configuration is successful. For a deeper check, use tools like IPLeak.net to detect DNS or WebRTC leaks. If the DNS servers listed don’t match your real location, your anonymity is protected.
Key takeaway: Most proxy issues result from small mistakes in the IP address or port number. Always double-check your proxy server Chrome settings before assuming the problem lies with the server.
Security and Privacy Tips
Setting up a proxy server in Chrome is an important step toward better online security, but it should be part of a broader privacy strategy. Here are a few key tips to help you stay truly safe while browsing.
Use HTTPS Proxies:
Always choose proxies that support HTTPS or SSL. These connections encrypt your data, making it much harder for hackers or third parties to intercept your information. Compared to standard HTTP proxies, HTTPS proxies provide a stronger level of protection and privacy.
Keep away from Free and Unreliable Proxy Lists:
Free proxies can be risky, slow, or even controlled by people trying to collect user data. If you handle sensitive tasks like business research or account management, it’s worth investing in a trusted paid provider such as 9Proxy, which ensures speed, reliability, and security. Even for gaming or streaming, setups like a ps3 proxy server can enhance access control and stability when configured properly.
Combine with Other Tools (VPNs, User Agents):
For maximum safety, use both a proxy and a VPN. The VPN encrypts your entire internet connection, while the proxy masks your IP address in Chrome. You can also change your User Agent to prevent browser or device fingerprinting for extra privacy.
9Proxy – Reliable Chrome Proxy Service for Safe and Private Browsing
9Proxy knows that developers, marketers, and privacy-focused users need reliable tools to stay secure and efficient online. That’s why we deliver high-quality residential proxies optimized for a seamless proxy server Chrome experience. 9Proxy proudly delivers fast, reliable, and fully anonymous residential proxies tailored to meet every online need.
Key Feature of 9Proxy:
- 100% Real Residential Proxies: Genuine IPs from real users in over 90 countries, with a pool of 9M+ clean IPs.
- Exclusive Proxy Pool: Not shared with other providers, minimizing blacklist risks.
- Unlimited Bandwidth: Pay per IP, not per GB; ideal for heavy tasks like scraping or streaming.
- Affordable Pricing: From $0.04/IP, plus free trials for new users.
- Crypto Bonus: Get 5% extra IPs when paying with cryptocurrency.
- Refund & Today List: Quick refund if a proxy fails within 60 seconds, and reuse active IPs within 24 hours.
- Full Protocol Support: Works with SOCKS5, HTTP, and HTTPS for maximum compatibility.
With 9Proxy, you get secure, fast, and flexible proxy solutions designed for performance and privacy.
FAQ
Can I use multiple proxy servers with Chrome?
Yes, you can. To manage several proxies easily, install a Chrome extension like Proxy SwitchyOmega. It lets you create and switch between different proxy profiles quickly. Without such an extension, Chrome can only use one system-wide proxy setting at a time.
Why is my Chrome not connecting to the internet when using a proxy server?
This usually happens because of incorrect proxy server Chrome settings, such as a wrong IP address or port number. It could also mean the proxy server is offline or disabed by your firewall. Double-check your settings, confirm your credentials, and try another server or port if needed.
Can I use a VPN and a proxy server together in Chrome?
Yes. Using both adds stronger protection; the VPN encrypts all your internet traffic, while the proxy server hides your IP specifically in Chrome. Together, they improve both privacy and anonymity.
Can I use a proxy server with Incognito mode in Chrome?
Absolutely. Since the Chrome proxy server configuration works at the system or extension level, your proxy settings apply to all browsing sessions, including Incognito mode.
Conclusion
We’ve covered everything you need to know about setting up a Proxy Server Chrome, including what it does, why it’s useful, and how to set it up on Windows or macOS. Using a proxy server is a simple way to protect your privacy, stay secure, and reach websites that might be prevented in your area.
While the setup process is easy, the quality of the proxy you use makes all the difference. That’s why 9Proxy is the best choice. We provide fast, stable, and anonymous residential proxies that keep your Chrome browsing safe and smooth.
Take control of your online privacy today with 9Proxy and enjoy a faster, safer proxy server Chrome experience.